 Tyne Seedling
You will learn how to dig narrow trenches directly through vegetable beds to bury raw vegetable trimmings. This method feeds subterranean earthworms without requiring bulky compost bins or attracting rodents.
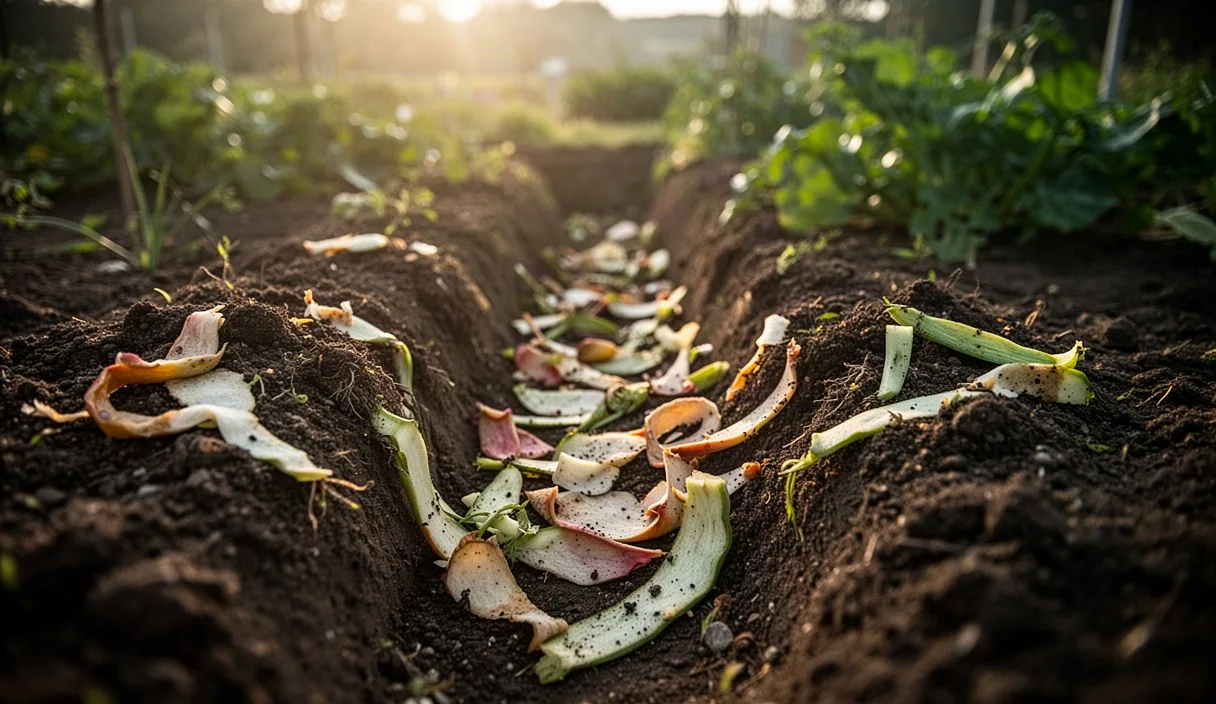
- Dig trenches thirty centimeters deep to keep buried kitchen scraps cool and protected from surface pests.
- Chop coarse kitchen waste into small pieces before burying to speed up decomposition by soil microbes.
- Cover trimmings with garden soil and wait eight weeks before planting directly above the trench.
Every morning in the workshop and kitchen, we generate cuttings that carry moisture and mineral value. Rather than hauling these wet peelings, brassica ribs, and coffee grounds to an open pile that demands weekly pitchfork work and summer watering, we often prefer to return them directly to the earth. Direct trenching, often called French trench composting, is an old, quiet method of soil building. It involves opening a clean slit or furrow in the ground, packing the raw matter into the floor of the trench, and sealing it immediately with native earth.
When we bury kitchen discards beneath a solid blanket of garden soil, we eliminate the smells that call neighborhood dogs or rodents. At the same time, we keep the nitrogen, moisture, and biological activity right in the garden bed where our crops will feed. The surrounding soil absorbs the moisture like a wetted brick, while worms and anaerobic-to-aerobic microbial successions break the fibers down out of sight. It is a slow, rhythmic practice that turns kitchen work into next season's crumbly topsoil.
How In-Situ Trench Composting Builds Soil Sponge
A standard compost pile loses mass to the open air through oxidation and heat. As the pile steams, carbon escapes as carbon dioxide, and nitrogen off-gases as ammonia. When we bury fresh scraps directly into the ground, that biological burn happens in a closed chamber of mineral soil. The gases, humic fractions, and water are captured by the clay and silt particles directly adjacent to the trench. Nothing blows away on the wind, and no rich compost tea leaches down past the reach of garden roots during a sudden cloudburst.
The primary benefit to the soil structure is the creation of what soil scientists call the soil sponge. As earthworms discover the buried layer of vegetable matter, they travel vertically from the subsoil to feast. They consume the softening vegetable matter, mix it with mineral grains in their guts, and deposit stable casts along the trench walls. These worm burrows remain behind as durable macro-pores. When heavy rain falls months later, the water does not sheet off the surface; it runs directly down these worm channels into the subsoil.
Underground breakdown also shelters beneficial mycorrhizal fungi and indigenous bacteria from temperature spikes and drying winds. In an above-ground heap, the outer six inches often dry to a crisp husk that halts biological work. Underground, moisture levels remain stable. The buried scraps slowly decay at the native soil temperature, creating localized pockets of dark, carbon-rich soil that hold up to four times their dry weight in water.
Tools and Trench Dimensions for Garden Pathways
To dig an efficient trench without disturbing surrounding plant roots, we choose tools with narrow, straight blades rather than wide, dished scoops. A traditional English trenching spade, sometimes sold as a drainage spade or poacher's spade, is ideal. Its blade is long, narrow, and slightly tapered, which allows us to slice clean, vertical walls without dislodging the walkway edges. A garden fork helps loosen hardpan clay at the base, and an ordinary flat-head transfer shovel clears out the loose soil, leaving a flat floor.
Dimension matters when burying fresh matter. If a trench is dug too shallow, scavenging animals will catch the scent of sweet vegetable peelings and dig up the garden bed overnight. If it is dug too deep, the scraps land in cold, anaerobic subsoil where biological activity stalls due to a lack of oxygen. We dig to a total depth between 12 and 16 inches. The bottom 4 to 6 inches hold the chopped scraps, leaving a minimum cap of 8 to 10 inches of compacted soil over the top.
| Trench Location | Depth | Width | Scrap Capacity per Linear Foot |
|---|---|---|---|
| Raised bed centerline | 12 to 14 inches | 8 to 10 inches | 3 to 4 pounds |
| Pathway between beds | 14 to 16 inches | 10 to 12 inches | 5 to 6 pounds |
| Garden bed perimeter | 10 to 12 inches | 6 to 8 inches | 2 to 3 pounds |
Siting these trenches in walking pathways between growing beds is especially practical. As we walk over the buried trenches during the season, our boot pressure lightly firms the soil cap, eliminating air pockets that might attract burrowing pests. The nutrients and moisture migrate horizontally into the adjacent raised beds, where lateral roots of tomatoes, squash, and beans easily seek them out through the porous subsoil walls.
Acceptable Kitchen Materials and What to Exclude
Because the material is buried without the intense 140-degree heat of an actively turned compost pile, we must be selective about what we bury. The soil ecosystem handles high-cellulose vegetable scraps with ease, but dense proteins and fats persist for too long without air, leading to sour, putrid conditions below ground. We keep a dedicated stainless steel bucket on the counter to gather clean, vegetable-based scraps throughout the week.
Soft materials decompose fastest and feed the largest variety of subterranean life. We include all leafy vegetable trimmings, squash rinds, potato skins, crushed eggshells, spent coffee grounds, unbleached paper coffee filters, and tea leaves. Citrus rinds and allium skins from onions and garlic can be added, though they should be balanced with sweet greens so the local worm population does not avoid the trench during the first two weeks.
- Include freely: Carrot tops, cabbage cores, apple cores, bruised fruit, sweet corn cobs split lengthwise, rinsed eggshells, and damp coffee grounds.
- Include in moderation: Citrus peels, whole onions, dry bread crusts, stale plain oatmeal, and shredded brown cardboard.
- Exclude strictly: Cooked meats, poultry bones, bacon grease, whole cheeses, pet waste, and diseased crop residue such as tomato vines showing signs of late blight.
Animal proteins and heavy oils coat soil particles, preventing water absorption and suffocating the soil bacteria. They also produce butyric and sulfurous acids that linger in the ground, causing roots to turn away from the site. If an item smells rancid in the bucket, it does not belong in a quiet trench.
Chopping and Layering Scraps with Native Garden Soil
Successful in-situ composting depends on surface area. A whole, uncut winter squash can sit intact underground for an entire year because its waxy rind resists bacterial penetration. When we prep kitchen trimmings for burial, we take five minutes at the bench or the garden wheelbarrow to chop large chunks into pieces roughly the size of a walnut, no larger than one or two inches across.
To speed decomposition, follow this physical routine when filling the trench:
- Loosen the subsoil floor: Drive a garden fork four inches deep into the exposed bottom of the trench and rock it back and forth. This breaks glaze on clay soils and opens paths for drainage and worm travel.
- Lay down dry carbon: Scatter a half-inch bed of dry leaves, chopped straw, or shredded brown paper along the bottom. This acts as a blotter for excess vegetable liquid.
- Deposit the chopped scraps: Spread the chopped scraps evenly along the trench floor. Keep this wet green layer between three and four inches thick. Packing it deeper than six inches creates an airless core that will rot sour.
- Incorporate native soil: Take a small shovel of the dug-out garden soil and lightly dust it through the scraps, roughly one part soil to three parts scraps. This introduces native bacteria directly to the cut surfaces.
- Backfill and pack the cap: Shovel the remaining soil over the trench until it mounds two inches above the surrounding grade. Press the soil down firmly with the flat sole of your boot to seal against smells. Over the coming weeks, the mound will settle flush with the bed as the material breaks down.
Seasonal Decomposition Timelines for Root Beds
Because the material sits at native ground temperature, seasonal weather dictates how fast the trench turns into dark crumbly humus. Soil moisture, ambient warmth, and the local earthworm population control the timeline. We adjust our digging schedule according to the season, always working ahead of our planting calendar by at least one full cycle.
| Season of Burial | Soil Temperature Range | Approximate Breakdown Time | Best Follow-up Crop |
|---|---|---|---|
| Late Spring | 60 to 75 degrees Fahrenheit | 5 to 7 weeks | Late summer brassicas or autumn leeks |
| Mid Summer | 75 to 85 degrees Fahrenheit | 3 to 5 weeks | Autumn spinach, radishes, winter greens |
| Mid Autumn | 45 to 55 degrees Fahrenheit | 16 to 20 weeks (over winter) | Spring-planted peas, early potatoes |
| Winter | Below 40 degrees Fahrenheit | Dormant until spring thaw | Summer squash, field tomatoes |
During the warm days of summer, the biological engine operates at full speed. When we pull back the earth after thirty days, watermelon rinds and lettuce ribs have disappeared entirely, leaving only a dark, greasy stain in the soil profile and white flecks of eggshell. In the dead of winter, frozen scraps remain preserved in the cold mud; biological activity only resumes when the soil temperature rises above 48 degrees Fahrenheit in early April.
Planting Heavy-Feeding Vegetables Over Broken-Down Scraps
Direct trenching is particularly valuable as site preparation for heavy-feeding crops. Vegetables that demand steady nitrogen, phosphorus, and moisture will route their roots directly through old trench lines, mining the rich vein of organic matter. Cucurbits, including winter squash, pumpkins, and cucumbers, perform exceptionally well when planted adjacent to a trench that was filled four to eight weeks prior.
When preparing a bed for sweet corn or brassicas, we dig parallel trenches twelve inches apart across the bed during the autumn. By the time transplants hit the ground in late spring, the soil exhibits an open, crumbly crumb structure that holds water through dry spells without becoming waterlogged. We inspect the trench area before planting by driving a trowel deep into the center. If the scraps still look recognizable and smell fermented or sour, we give the ground another two weeks to air and balance out before setting tender seedling roots into it.
Tomatoes also benefit from the deep moisture reservoir a buried trench provides. Rather than planting directly into the fresh scraps, we plant our tomato seedlings six inches to the side of the trench line. As the plant develops its deep root system, the feeder roots branch out laterally, entering the decomposed kitchen pocket just as fruit set begins, which provides a steady supply of moisture that prevents blossom end rot.
Common Mistakes to Avoid
The most frequent failure in trench composting is shallow burial. When scraps are buried under only three or four inches of loose loam, foxes, raccoons, and dogs will quickly locate the trench and scatter the garden bed. Maintain a strict minimum of eight inches of well-tamped soil above the highest scrap layer.
Another error is creating thick, unmixed mats of wet materials. Dumping five pounds of boiled pasta, wet bread, or thick fruit purée directly into a pit creates an impermeable, gummy layer. Soil microbes require microscopic films of air to do their work. If you have wet, dense starches, disperse them across ten feet of trench and toss them thoroughly with dry autumn leaves or native soil before burying them.
Finally, avoid digging deep trenches immediately adjacent to the trunks of established woody shrubs or fruit trees. Chopping through major structural roots causes stress and creates entry points for fungal pathogens. Keep your trenching work out in the vegetable beds and open pathways where annual roots will turn over cleanly year after year.
Practical Next Steps
To begin using this method this week, choose an empty garden path or an open section of a raised bed that will not be planted for at least six weeks. Take a narrow trenching spade and cut a straight test furrow four feet long and fourteen inches deep. Place the excavated soil cleanly along one side of the trench, keeping it free of stones and weed crowns so it is easy to shovel back in.
Collect your kitchen scraps for three or four days, chop them roughly with an old heavy knife or the edge of your spade, and distribute them along the trench bottom. Dust them with a handful of native soil, rake the excavated earth back into the trench, and step down firmly along the seam. Mark the date and location with a wooden survey stake so you can track the breakdown time and plan your next crop directly beside the line.
Our field notes serve general horticultural education; consult your local agricultural extension service for regional biosecurity rules and persistent plant pathology. Disclaimer

Complementary Reading
-
 Soil & Living Compost 10 min read
How to Build a Balanced Seedling Potting Mix at Home
You will learn how to sift, blend, and moisten your own porous seedling medium using simple base ingredients. With the right balance of peat moss substitute, vermiculite, and leaf mold, young roots breathe easily and anchor firmly.